Skip to content
Installing a metal roof involves a systematic process of preparing the roof deck, laying down protective underlayment, and securing metal panels with specialized fasteners. The process begins with measuring the roof and ordering materials, followed by the installation of drip edges and eave flashing. Each panel must be aligned precisely and fastened using gasketed screws that allow for thermal expansion while maintaining a watertight seal. Completing the installation requires fitting closure strips and ridge caps to protect the highest points of the structure from wind and rain.
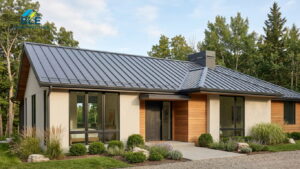
Successful installation depends on attention to detail and adherence to safety protocols. A durable metal roof can last fifty years or more when installed correctly, making it a long-term solution for home protection. According to data from the Metal Roofing Alliance, metal roofs provide superior resistance to fire, wind, and hail compared to traditional asphalt shingles. Market data from Grand View Research indicates that the rising demand for sustainable and energy-efficient building materials is further driving the growth of the metal roofing sector. This guide outlines the professional standards for a high-quality installation that ensures longevity and weather resistance.
Factors to Consider Before Starting the Project
Before purchasing materials, homeowners must evaluate several variables that influence the success of the installation. The pitch of the roof is the most significant factor because it dictates the type of metal panel required. For example, a low-slope roof often requires standing seam panels with mechanical seams to prevent water from backing up under the metal. Steep-slope roofs have more flexibility and can use corrugated or screw-down panels.
Local weather patterns also dictate material choice. Homeowners in coastal areas might choose aluminum to avoid salt-spray corrosion, while those in heavy snow regions need panels with high load-bearing capacities. The International Code Council provides guidelines on building codes that may require specific snow guards or thicker gauges of metal depending on the geographic location.
Material Selection Comparison
The choice of metal affects the cost, weight, and lifespan of the roofing system. Steel is the most common choice due to its balance of strength and affordability, while copper offers the longest lifespan but at a much higher price point.
| Material | Average Lifespan | Weight (per sq. ft.) | Best Use Case |
|---|---|---|---|
| Galvanized Steel | 30 to 50 Years | 1.0 to 1.5 lbs | General residential use |
| Aluminum | 40 to 60 Years | 0.5 lbs | Coastal or high-humidity areas |
| Copper | 70 to 100+ Years | 1.5 lbs | Historic or high-end luxury builds |
| Zinc | 60 to 80 Years | 1.2 lbs | Modern architecture and durability |
Tools and Safety Equipment Requirements
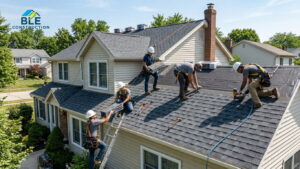
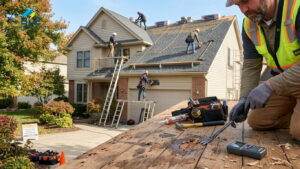
Safety is the top priority for any roofing project because falling from heights remains a significant risk in the construction industry. The Occupational Safety and Health Administration mandates the use of fall protection systems, such as harnesses and anchors, for work on roofs with a height of six feet or more.
Required tools for a metal roof installation include:
- Cordless drill with nut drivers
- Tin snips or a metal-cutting circular saw
- Chalk line for layout
- Tape measure and square
- Riveter for trim pieces
- High-quality sealant and caulking gun
Preparing the Roof Surface
The roof deck must be smooth, dry, and free of debris before any metal is applied. While some contractors install metal over old shingles, removing the old roofing allows for a thorough inspection of the plywood or OSB decking underneath. If any wood is rotted or soft, it must be replaced immediately.
Once the deck is clean, install a high-temperature underlayment. Unlike the felt paper used for shingles, metal roofing underlayment is often synthetic and must be able to withstand the high heat that metal panels absorb during the summer months. Overlap the edges of the underlayment by at least six inches and secure it with plastic cap nails to prevent moisture from reaching the wood deck.
Bonus Tip: Before laying the main underlayment, apply a self-adhering ice and water shield along the eaves and in valleys. Metal roofs can shed snow quickly, and these areas are most prone to ice damming or water backup.
Installing Trim and Drip Edges
Trim installation happens before the main panels go down. The drip edge goes along the eaves first. This metal trim directs water away from the fascia board and into the gutters. Fasten the drip edge every twelve inches with roofing nails. At the gables or the sides of the roof, install rake trim to provide a finished edge for the panels.
In areas where the roof meets a wall, such as a dormer or a second story, install sidewall flashing. This piece of metal fits behind the siding and over the roofing panel to keep water from entering the junction. Ensure all trim pieces overlap by at least two inches and apply a bead of sealant at the joints to prevent wind-driven rain from getting underneath.
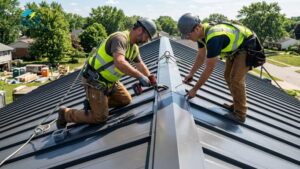
Positioning and Fastening Metal Panels
Start the panel installation at the side of the roof opposite the prevailing wind. This prevents wind from catching the overlapping edges of the metal. Lay the first panel down and ensure it is perfectly square with the eave. If the first panel is crooked, every subsequent panel will be misaligned.
Use self-tapping screws with neoprene or EPDM washers. These washers create a seal around the hole when the screw is tightened. It is important not to over-tighten the screws, as this can crush the washer and cause it to crack over time. Conversely, under-tightened screws leave a gap where water can enter.
Bonus Tip: Use a string line or a chalk line across the panels to ensure your screw rows stay straight. This creates a professional appearance that is visible from the ground.
Managing Transitions and Ridges
The ridge is the highest point of the roof where two slopes meet. Before installing the ridge cap, place closure strips along the top edge of the panels. These strips are shaped to fit the profile of the metal ribs. They block insects, debris, and snow from blowing under the ridge cap while still allowing the roof to breathe if you use vented closures. Vented ridge caps improve energy efficiency by reducing attic heat buildup. Once the closures are in place, center the ridge cap over the peak and fasten it through the ribs of the panels into the roof structure.
Common Questions About Metal Roof Installation
People often wonder if metal roofing is noisier during rain than other materials. When installed over a solid wood deck with a quality underlayment and attic insulation, the sound is virtually identical to an asphalt shingle roof. The wood and insulation act as sound dampeners that absorb the vibrations of the rain hitting the metal.
Another common question involves lightning. Metal conducts electricity, but it does not attract lightning more than any other material. Because metal is non-combustible, it is actually a safer option if a strike occurs, as it will not catch fire like wood or shingles.
Practical Maintenance and Final Inspection
After the installation, walk the roof one last time to remove any metal shavings. These “swarf” particles are created when cutting or drilling the panels and will rust quickly, staining the finish of the new roof. Check every fastener to ensure the washers are seated correctly against the metal surface.
Annual maintenance for a metal roof is minimal. Keep gutters clear of debris to prevent water from backing up against the eave trim. Inspect the sealants around vent pipes and chimneys every few years, as these are the most likely spots for leaks to develop over time.
FAQ
Can I install metal roofing over my existing shingles?
Yes, it is possible if the local building codes allow it and the roof structure can handle the weight. However, removing old shingles is generally better because it allows for an inspection of the decking and ensures a flatter surface for the new metal panels.
Do I need special tools to cut metal panels?
Use a circular saw with a blade specifically designed for metal or a pair of high-quality tin snips. Never use an abrasive grinding wheel, as the heat can damage the protective coating on the edges of the metal and lead to premature rusting.
How do I stop the panels from leaking at the screw holes?
The key is using the right fasteners with EPDM washers and driving them in at a 90-degree angle. Ensure the screw is tight enough to slightly compress the washer without bulging it out or deforming it.
What should I do about the noise during heavy rain?
Ensure the roof deck is solid and use a thick synthetic underlayment. Proper attic insulation also plays a major role in keeping the interior of the home quiet during storms.
Evaluating Your Installation Needs
Installing a metal roof requires precision and a commitment to safety. Homeowners should evaluate their comfort level with heights and their access to specialized tools before attempting a DIY installation. While the process is straightforward, mistakes in flashing or fastener tension can lead to expensive water damage. BLE Construction provides the expertise needed to handle these technical details. For more information or professional guidance, contact BLE Construction at (314) 486-1786 or reach out via email at bevans0927@gmail.com. BLE Construction focuses on delivering durable results for every project.
Sources
- Metal Roofing Alliance – A leading industry resource providing data on the benefits, lifespan, and performance of metal roofing systems.
- Occupational Safety and Health Administration – The federal agency responsible for setting safety standards for construction and roofing projects.
- Grand View Research – A market research firm providing data on the growth and trends within the global metal roofing market.
- International Code Council – An organization that develops model codes and standards used in the design and build process to ensure safety and resilience.